Toilets
If you need any assistance, you are always welcome to contact our Customer Service team toll free at 1-800-460-7019 or email us at info2020@sustainablesolutions.com
If you need any assistance, you are always welcome to contact our Customer Service team toll free at 1-800-460-7019 or email us at info2020@sustainablesolutions.com

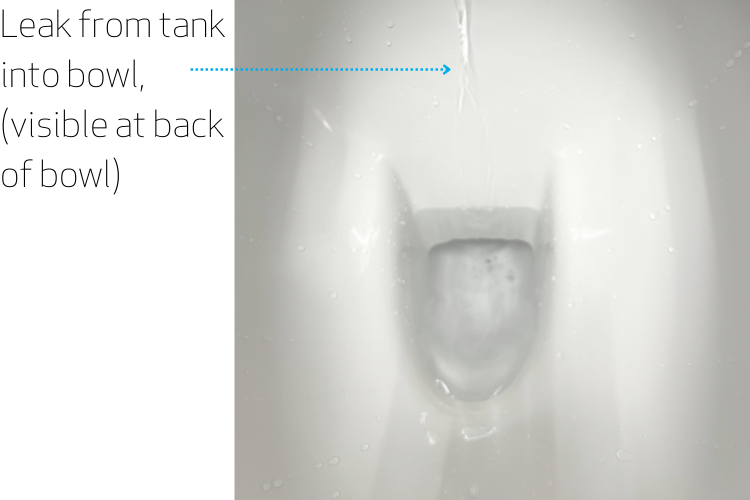
Let's Identify the problem.
There are two main valves inside your tank that could be responsible:
Inlet (Fill) Valve – Controls water coming into the tank.
Outlet (Flush) Valve – Allows water to leave the tank during a flush.
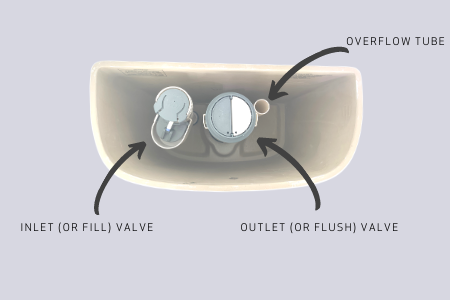
Cause #1-Inlet Valve Issues:
Signs:
Why it happens:
Debris is stuck inside valve → prevents it from shutting off.
Worn seals → valve doesn’t fully close, water keeps running.
Solution:
If toilet is newer or there’s been recent construction/storms/flooding in your area, try cleaning the inlet valve: (these conditions increase the amount of debris present in incoming water, which makes the presence of debris in your tank/valves more likely.)
Shut off water supply.
Remove inlet valve.
Soak in 50/50 vinegar-water solution for 10 minutes.
Rinse, repeat if needed, reinstall.
If toilet is older or in hard-water areas, replace seals (every 2–3 years) or replace the entire inlet valve head.
How to do this? This will depend on what toilet you have. (One piece or Two Piece toilet. Please check our YouTube chanel, (link below), for step by step instructions.
Cause #2: Outlet (Flush) Valve Issue
Signs:
Water level is normal (at the fill line).
Still see a slow trickle into the bowl.
Why it happens:
The seal at the bottom of the flush valve has worn down or cracked.
More common with hard water or if you’ve used in-tank chemical cleaners. (Note: in-tank cleaners should never be used. They can void your warranty.)
Solution:
Replace the flush valve seal (standard toilet maintenance every couple of years).
Easy DIY part swap—specific replacement part depends on your toilet model.
How to do this? This will depend on what toilet you have. (One piece/ Two Piece, Top Button flush, Side lever flush).
Relation Issue: Phantom Flush - (your toilet seems to periodically flush on its own) Click here for trouble shooting on the issue of Phantom Flush.
Check out our Sustainable Solutions Youtube Chanel for lots more videos on toilet maintenance and repair. YouTube
If you need assistance, please contact our Customer Support and Product Specialist Team
Call: 1-800-460-7019 - Local 0
email: help@sustainablesolutions.com

The Issue: Water drains out of your toilet bowl between flushes.
Description:
1. The most common issue is an installation error. All of our products use a wash-down technology rather than siphonic system as wash-down allows for a much larger trapway and superior drain line carry. . It is extremely important when installing a wash-down toilet that you use the correct wax seal. A popular wax seal used in the industry goes by many names and features a plastic horn or flange. Never use a horned wax seal on any wash-down toilet. It can seriously impact the performance of the toilet.

One of these issues, is making the toilet go 'siphonic'. This means that the flange on the wax ring narrows the waste outlet too dramatically for the fast flush of a wash-down toilet which can create a siphoning effect in the waste line. This can cause the water that has refilled the bowl to be pulled out with the previous flush.
Solution: The best solution is to remove the horned wax ring and replace it with the recommended standard wax ring. Not only can they cause this issue of siphoning out the bowl water, they can also seriously reduce the flush performance, including not effectively removing the waste. (Note - all of our instructions clearly indicate that a horned wax ring is not to be used).
2. Each home is plumbed differently, and some schematics are better than others. Sometimes directly after the initial drop off, waste lines can take 90-degree turns like is pictured below. This too can cause a siphoning action in toilets.

Solution: The solution is much less simple if the problem lies in the plumbing itself. If the toilet is flushing well otherwise, it is possible to correct the problem with a Refill kit.
A refill kit is a very simple fix that is a great way to fix the issue of an emptying bowl. In essence the recharge kit directs water from the tank through the overflow on the flush valve directly into the bowl.
To be clear, a refill kit can't fix every problem, but it is a great place to start.

To fix a leaking Outlet (Flush) Valve or for regular tank maintenance you may need to replace the Seal at the bottom of the Valve. The easiest way to find the right part is to simply take the tank lid off and look at the shape and color of your Outlet Valve. Look below and find the outlet valve that matches yours. The Valve Seal for that outlet part is listed below each image, and if you click on the Seal image or name you will be taken directly to our parts store where you can order.

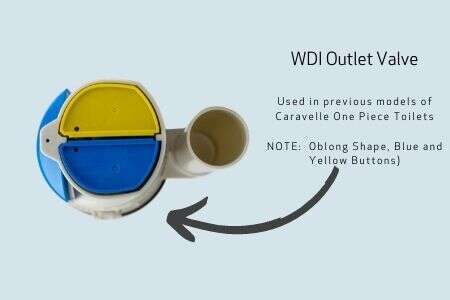
If you have this WDI Valve Pictured Above, Order the 687242 Seal

If you have this WDI Outlet Valve as Pictured Above: Please Order the 30795 Seal

If you have an M5 Valve as pictured above, please Order Valve Seal #750017

If you have a Hi-Flow Outlet Valve as pictured above, please Order Outlet Valve Seal 405006

If you have a Geberit Outlet Valve as pictured above, please Order Outlet Valve Seal #750017

Inlet valves are largely interchangeable, but you must know which inlet valve you have if you wish to repair, rather than replace it. It is less expensive to repair an inlet valve and while it can be more difficult than replacing the entire valve, it does save you the trouble of having to remove the water supply line from your toilet, completely draining the water from your tank and in the case of a 2-piece toilet, often having to remove the tank from the bowl.
First determine which inlet valve you have and then have a look at our How-to videos to decide what the best solution is for you. We are currently using 3 different inlet valves in our products:
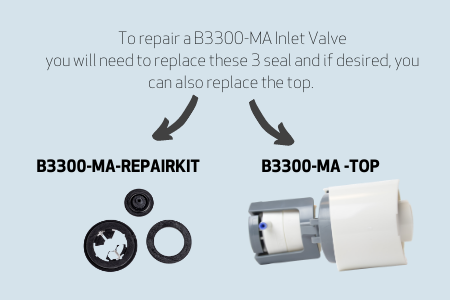
This is a B3300-MAinlet valve. If you want to replace the entire valve, this is the number you would reference when ordering.
If you wish, you can repair, rather than replace the valve which involves replacing the 3 seals. You can also replace the top (head) piece, but this only needs to be done if the top is damaged. Whether or not you choose to replace the top, you will need to replace the 3 seals. Click here to watch how to make this repair.
This is a 687144 Quietflow II Inlet valve, (not interchangeable with the original Quietflow valve). If you want to replace the entire valve, this is the number you would reference when ordering.
If you wish to repair, rather than replace this valve you would order the 687040 Quietflow II repair kit. To see how this repair is done, you can click here to watch the video.
The last inlet valve we offer is the A1280.
To repair this valve you would need the following A1280-REPAIRKIT. To see how this is done, click here to watch the video.
The flush valve in your Caravelle Smart lever toilet is connected to the handle assembly so replacing one involves replacing both.
Before removing or adjusting any internal tank components on your toilet make sure to turn off the water supply by turning the handle at the water inlet, located behind the toilet. Flush until as much water as possible empties out of the tank. You can then remove the remaining water by either sucking up with a shop vacuum or using a sponge to soak up the remaining water.

Remove the tank lid.
Remove the flush valve by turning it in a counter-clockwise direction and lifting upwards. Rest the removed flush valve on the top of the tank while disconnecting the lever handle. You will see a blue plastic nut located in between the handle and the handle box. Turn in a clockwise direction until it detaches from the main spindle. Remove the Flush Valve and the attached box; set aside.


Remove the base of the flush valve and the attached overflow tube by using a medium sized Phillips screwdriver. Turn the screw in the centre of the base in a counter-clockwise direction until you can remove the base and set aside. Important tip: Most of the time when replacing the outlet valve you will NOT have to remove the base. You can insert a new outlet valve into an existing base. The only reason to replace the base is if it is broken or cracked. If your existing base is intact, simply delete this step.
Next you will remove the handle

Pull the handle out. You might need to wiggle the handle a little bit to more easily pull it out from the hole in tank where it is installed.
You are now ready to install the replacement handle and flush valve.
Insert the lever handle in to the hole at the side of tank. Replace the charcoal and white rubber gaskets in the correct order and then place the large white nut on to the spindle and turn in a counter clockwise direction, (clockwise for a right mounted lever handle). Important tip: While you are rotating the nut, hold the handle up to the proper position. If you let it drop down you will be attaching it in the wrong position. (The handle will drop down once you stop holding it, but this is fine. Once the remainder of the lever handle is connected it will be aligned properly.
If you removed the valve base and overflow tube earlier you should now install the replacement by inserting it back into the hole at the bottom of the tank, (making sure to position it the same way it was originally placed, with the overflow tube placed to the right of the base, as pictured below). Tighten it using a Phillips screwdriver until placed solidly, without movement. Do not over tighten or you may crack the base. It simply needs to be in place without any movement).
Insert the flush valve by placing into the base and turning in a counter-clockwise direction until it clicks into place.
Attach the handle base on to the handle spindle. It’s a good idea to tuck the tube behind the flush valve to get it out of your way. (Important tip: While attaching the base and screwing it in to place, hold the handle up to the desired position. 
If you don’t hold the lever handle to the correct position, you will be tightening it in to the downward position). To tighten, turn the blue plastic nut in a counter-clockwise direction until firmly in place.
That is it! Turn the water supply back on, your tank will fill up, replace the lid and you are done.
If you have any any questions, please contact our customer service team at 1-800-460-7019

This video shows the Quietflow II valve outside of a toilet tank so that you can more easily see it and all of its parts. (Normally your inlet valve can remain inside the tank while you change it, making this maintenance very quick and easy).
Replacement part needed to complete this repair: 687040
The seal is located inside the top housing of the Inlet (fill) valve. You will need to remove the outer casing of the housing to gain access to the seal.


2. The lever located on the side of the inlet valve at the top has a small plastic piece that protrudes from the bottom. The section that protrudes clips into a hole on the moveable arm located on the main shaft of the inlet vale. Unclip the top arm from the arm on the valve
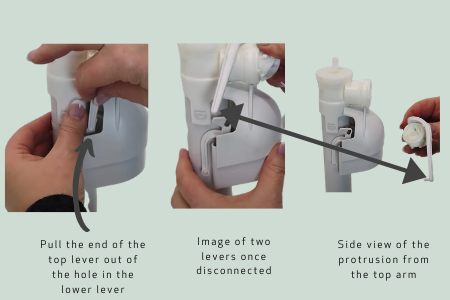
3. Pull the entire top housing with attached lever out from the valve, which will expose the blue seal.

4. Remove the worn seal and replace with new seal.
5. Slide the full housing portion back in to the side of valve and then twist to lock into place.
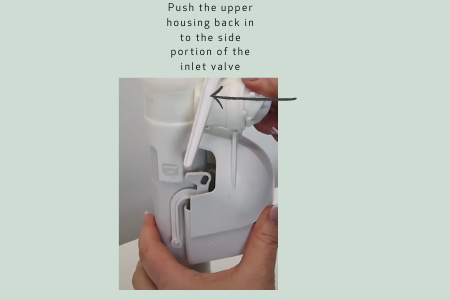
6. Re-clip the top arm back on the lower arm.
7. Turn the water supply back on to your tank and you are done.

At the bottom of your outlet (flush) valve in your toilet tank there is a seal that helps to ensure that water does not leak unintentionally from the tank into the bowl. Over time this seal can wear. It is standard maintenance to replace the seal generally about every 2 years. (You might need to replace it more often if you live in an area with Hard water or use in-tank cleaning product. Note: in-tank cleaning products may void your warranty). Here is how you replace it. )
Before doing any maintenance work to your toilet you should always turn off the water supply. After turning off the water supply, flush the toilet until as much water as possible drains from the tank, giving you access to the valve.

Remove the tank lid. Each toilet looks a little different inside, but you should see an inlet (fill) valve, and and outlet, (flush) valve.
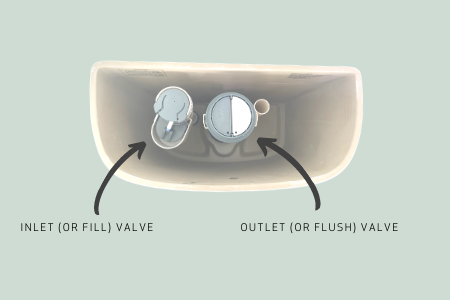
The outlet valve body is connected to the base at the bottom with clips. Holding the valve firmly, turn it in a counter-clockwise direction. Once it is released from the base lift it up and away from the base. (Note: if you have a toilet with a lever handle, there will be a cord connecting the flush valve to the handle. You can still pull the base off to change the seal, but it will remain connected to the handle).

Turn the valve over and you will see the seal at the bottom of the valve body. Simply pull it off.

Replace with a new seal. Be careful when replacing the seal to ensure that it is tucked in underneath the plastic disc at the bottom of the valve.

Once the seal is firmly in place, it is time to replace the valve back into the base.

Once the valve clicks into place, turn the water back on. Check to make sure that no water is leaking into the bowl, (which would indicate that the seal may not be placed correctly). If there are no leaks, replace the tank lid and you are done!

Part needed to complete this repair: B3300-MA-REPAIRKIT
Before doing any repairs to your toilet, make sure to first turn off the water at the supply line and flush the toilet until most of the water is removed from the tank. (You will not be completely removing the valve so you do not have to remove all water).
There are 3 seals in this valve that need to be replaced.

To start, remove the toilet tank lid and turn the top of the valve in a counter-clockwise direction and pull up to remove.

Remove the seal at the top of the valve body and discard.

Next you will need to remove the cylinder in the centre of the valve body. To do this, insert a small flat head screwdriver underneath the protruding tab on the top of the cylinder and pop it up. Then pull up the entire piece.

Now that you have accessed the lower seal, go ahead and replace it. When replacing, make sure to line up the notch in the seal with the tab in the valve body as shown below.

You can now replace that cylinder back in to the valve body, again lining up the tab on the cylinder with the notch in the valve body.

Replace the last seal that sits in the valve top. Simply pull it out, discard and replace, making sure that it sits securely in place.

You can now replace the top of the valve back on to the valve body. Make sure to line up the notch on the top portion with the tabs on the body. Turn clockwise until it clicks into place and you are done. Replace the tank lid and turn the water back on to refill your tank.


The part you will need to complete this repair: A1280-REPAIRKIT
Before doing any toilet tank repair or maintenance always turn the water supply off to the toilet and then flush the toilet to remove as much water as possible. You will not be removing the valve for this repair, so you don't have to remove the small amount of water left at the bottom of the tank.
A small flat head screwdriver is very useful for this work. Remove the tank lid and insert the end of the screwdriver under the top blue cap to pop it off.

There is a small white pin inserted through a hole under the top white cross hinge of the valve. This pin locks the inner components of the valve into place. You will need to remove it to gain access to the seals. Simply push the end of the screwdriver handle against the straight edge of the pin to dislodge it; once it is loose, pull it out and retain.

Pull the white top cross piece of the valve back to expose the top of the hole from which you just removed the white pin. Insert the screwdriver through the hole. This will give you the leverage to turn the top housing and remove it. The 2 seals that you will need to replace should now be exposed. Replace the seals.

Now simply reverse the procedure. Once the inlet valve is back together, turn the water supply back on and check that everything is working properly. Then replace the tank lid and you are done!

Replacing an inlet valve is very simple, but you do have to take a few steps before you start, to avoid spilling water on your floor and to make the job easy.
1. Turn off the water to the toilet
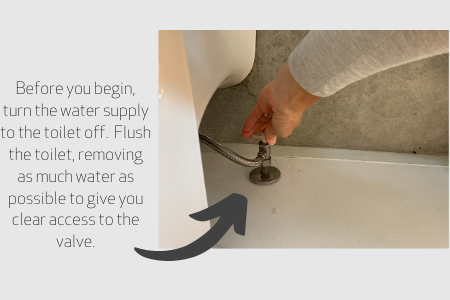
2. Remove all water in the tank by flushing the tank until as much water as possible is removed, and then using a shop vac or a sponge to remove the remaining water. Once the tank is dry, you can proceed with the change.
An inlet valve is connected by a plastic nut at the base of the toilet tank.
(Note: the design of some 2-piece toilets makes it difficult to access the inlet valve. If this is the case you may need to remove the tank from the bowl to gain access to the inlet valve. Each time you remove the tank from the bowl it is a good idea to also replace the tank to bowl seal to ensure a good tight fit. For instructions on how to do this, please click here).

Turn the nut in a counter-clockwise direction until it is completely removed from the lower portion of the inlet valve. Set aside.

Reach in to the tank and pull out the inlet valve. If you need to clean the inlet valve, rinse under water until debris is removed, or if it has calcified from hard water, you can soak in a 50-50 solution of water and vinegar for 30 minutes and then rinse again. Repeat as needed depending on the degree of dirt/calcification on the valve).
Replace the valve, or if installing a new valve, insert the new valve back into the mounting hole in the bottom on the toilet tank. Screw the plastic nut back on to the bottom portion of the inlet valve.
Turn the water back on and watch to ensure that that the water refills properly. Once the water is refilled, replace the tank lid and you are done.

You will require a replacement part #687214 Foam seal to complete this repair.
From time to time you may need to remove the tank from the bowl on a 2-piece toilet. You may want to remove the toilet to paint or refurbish a bathroom, or you may need to do some repair or maintenance on the toilet itself. This article explains how to do this.
First, turn off the water supply to your toilet.
Remove the tank lid.

Flush the toilet to remove as much water as possible and then use either a waterproof shop vac or a sponge to remove the remaining water at the bottom of the tank. Once all water is removed you can proceed.

The tank is connected to the bowl by 2 bolts that extend from the tank, through holes at the base of the bowl. They are held in place by 2 sturdy nuts. unscrew the nuts on both side and set aside.

Remove the tank by firmly grasping it on both sides and pulling upwards until the bolts clear the holes in the bowl.

IMPORTANT: To ensure a tight, waterproof fit, there is a seal installed between your tank and bowl. Each time you remove the tank it is a good idea to replace this seal as it works by compression, and once the tank is removed it won't seal as well a second time.
To remove the seal, grab firmly and pull off. It is connected with an adhesive tape and will lift off.

You will then need to replace with a new seal. All Caroma 2-Piece toilets use a 687214 foam tank to bowl seal. Remove the paper backing to expose the adhesive and press firmly to the bottom of the tank.

Replace the tank onto the bowl by lining up the 2 protruding bolts over top of the corresponding holes at the rear of your bowl and carefully lower it in to place.
Retrieve the plastic nuts that you removed earlier and screw back on to the tank bolts in a clockwise direction. The tank should be firmly in place with no movement, but be careful not to over tighten. Remember, the tank is made of vitreous china and if you over tighten it is possible to crack the porcelain.
Turn the water back on, and replace the lid. You are done.

Before doing any maintenance to a toilet you will need to remove all of the water from the tank.
First, you will need to turn the water supply to the toilet off.

Remove the tank lid and push down on one or both buttons of the flush valve until as much water as possible is drained from the tank.

There will always be a small amount of water left at the bottom of the tank. This is fine for some repairs, but if you are removing the tank you will need to remove all of the water to avoid water spilling on to your floor.
The easiest way to remove the extra water is if you have a waterproof shop vac. Simply vacuum up all of the water. If you do not have a shop vac, you will need to use a cloth or sponge to mop up the water until removed.

When the repair is finished, always remember to turn the water supply to the toilet back on.
It is very simple to remove the round button kit from a Caroma dual-flush toilet. First remove the lid and turn it over. Turn the plastic collar in a counter-clockwise direction until it comes off. Set aside.
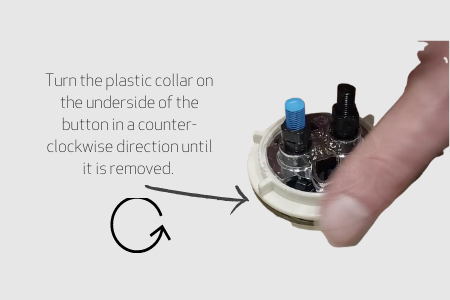
Turn the tank lid back over and pull the button kit upwards from the tank lid.

Then simply insert the new button kit into the tank lid hole and attach by turning the plastic collar in a clockwise direction until firmly in place. Return the tank lid to the tank.

To adjust a round Caroma dual flush button:
Remove the tank lid and turn over, exposing the bottom portion of the dual-flush button kit
There are two rods extending down from the button kit. These rods are attached to the top buttons and when a button is depressed. the rods push the top of the flush valve to activate the toilet flush. If they are not long enough, they won't reach the flush valve to be able to properly activate the valve. If they are too long, the tank lid won't sit properly on the tank. Fortunately they are very easy to adjust.
The two rods are held in place by a black nut at the base of the button kit.

Loosen the nut by turning in a counter-clockwise direction.

Once the nut is loosened, grip the rod itself and turn left or right to adjust to the desired height.

Once the rod reaches the correct height, re-tighten the nut at the base and then do the same for the other rod.
Once both rods are adjusted, return the tank lid to the tank.

To adjust an oblong Caroma dual flush button, (part #416283):
Remove the tank lid and turn over, exposing the bottom portion of the dual-flush button kit
There are two rods extending down from the button kit. These rods are attached to the top buttons and when a button is depressed. the rods push the top of the flush valve to activate the toilet flush. If they are not long enough, they won't reach the flush valve to be able to properly activate the valve. If they are too long, the tank lid won't sit properly on the tank. Fortunately they are very easy to adjust.
The two rods are held in place by a black nut at the base of the button kit.

Loosen the nut by turning in a counter-clockwise direction.

Once the nut is loosened, grip the rod itself and turn left or right to adjust to the desired height.

Once the rod reaches the correct height, re-tighten the nut at the base and then do the same for the other rod.
Once both rods are adjusted, return the tank lid to the tank.

The oblong dual-flush button kits on Caroma tanks are held in place by a single plastic bracket on the underside of the tank lid.

Using a medium Phillips screwdriver remove the bolt holding the bracket in place.

Turn the tank lid back over and pull the button kit upwards.

To replace the button kit, push it back into the hole in the tank lid, place the plastic bracket back over the underside of the button kit and attach with bolt.

If your 326611 soft-close, detachable seat is loose or isn't aligned properly to the bowl, it is a quick and easy fix. Step by step instructions are listed below and this video shows you the entire installation process.
1. First you will want to remove the seat. To do this, simply push the two quick release buttons on the inner centre of the seat underside and lift the seat upward to remove it from the mounting pins.
2. Remove the decorative hinge cover plates by lifting them upwards. Set them aside.
3. Using a Phillips screwdriver, loosen the bolts. (You will want them loose enough to be able to move the seat around to align it, but not so loose that it won't stay in place on it's own).
4. Replace the seat by aligning the hinge pins with the holes on the bottom of the seat. (Don't worry about replacing the hinge covers at this point. They are simply decorative and not needed to do the adjustment.)
5. With the seat attached, move the seat into the correct position, which will move the positioning of the hinge. Once the seat is properly aligned, (so the sides are evenly placed over the bowl and the front aligns with the front of the bowl), again remove the seat by pushing the. two quick release buttons on the inner centre of the seat, being careful not to move the hinge/pin positions.
6. Tighten the screws.
7. Replace the seat again, making sure that it is tight and aligned properly.
8. Once you are happy with the seat positioning, remove the seat again and replace the decorative hinge covers.
9. Replace the seat and you are finished!
Open the seat lid and you will see the quick-release buttons just above the seat hinges

Depress the buttons

Pull the seat up

To replace the seat after cleaning, simply align the holes over top of the seat hinge posts and push down.
It is a good idea to remove the seat during your regular weekly cleaning to keep the seat and bowl sparkling clean!

This article shows how to completely remove and replace the Outlet (flush) valve and lever handle on a Caroma dual-flush lever handle toilet. (Important note: MOST maintenance to the outlet valve does not require removing the base of the valve from the toilet. If you are not changing the valve model and the base is not damaged, it is easiest to leave the base in place and simply remove / maintain the valve body. If you are simply replacing the seal on the bottom of the outlet valve, you also do not have to remove the lever handle. You would only need to remove the valve body itself).
Before you begin it is important to always turn off the water supply to your toilet and remove the water from your tank. Click here to watch a video showing how to do this. (If you are not removing the outlet valve base, you don't have to remove all of the water from the tank, as water won't leak from the tank. If you are removing the base, it is very important to remove all water from your tank to prevent leaking onto your floor).
Step 1: Remove the outlet valve body from the base

Step 2: Disconnect the flush valve from the handle assembly

Step 3: OPTIONAL STEP - Remove the outlet valve base, (ONLY if required. You do not have to remove or replace the base for most outlet valve maintenance. It is much easier to simply leave it in place, even if replacing the valve body).

Step 4: You will next need to remove the handle, by removing the following 3 components:

Step 5: Remove the handle itself by pulling it straight out from the tank

You will now need to reverse the order to replace everything.
Replace the lid and you are finished!

One of the most common questions our Caroma customer service team gets is, "My toilet seat is broken. Which replacement seat is the right one for my toilet? "
That is both a simple, and sometimes slightly more complicated question. To get the answer you need to know a few things:
1. Do you have an elongated or a round front toilet bowl?
2. What is the style/ shape of your toilet?
3. And lastly, what kind of features do you want?
First things first. The most important thing to consider: is - do you have an elongated or round front bowl?
This is easy to determine. You measure from the seat holes in the bowl to the tip of the bowl. An elongated seat is about 18.5" while a round front bowl is about 16.5". (To see the full article giving pros and cons of elongated and round front toilets, Click Here)
Next - why do you have to consider your toilet style? Well, traditional toilets with standard 12" rough-ins have a lip at the back, allowing you to feed a bolt through the bowl and then tightening it underneath. This is called a bottom fixing seat, (meaning it tightens from the bottom). If you can easily reach underneath the bowl to tighten or loosen your seat, you likely need a bottom fixing seat.

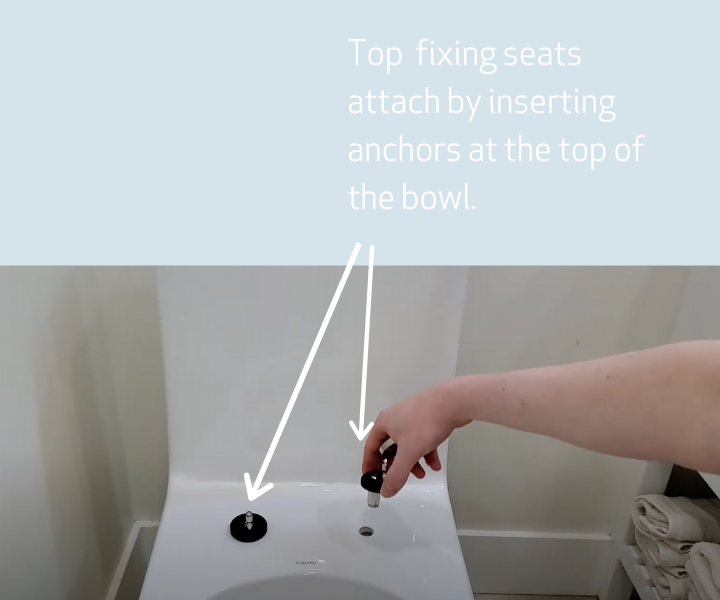
A lot of newer style toilets have what is called 'fully skirted' bowls, meaning that the side of the bowl is smooth and doesn't show the snake like trapway. If you have a skirted bowl it can be really difficult to reach underneath to attach or tighten a seat. For this type of toilet you should use a top fixing seat, meaning that the toilet seat tightens from the top. You essentially insert anchor bolts into the holes in the bowl and then the seat fits into the bolts. (It's similar to attaching something to drywall; you insert anchors into the wall and then insert the bolt or screw into the anchor). To watch a video showing the installation of our Caroma top fixing toilet seat to our fully skirted Caroma Caravelle Smart One Piece toilet, Click Here)
Style is also important if you have a uniquely shaped toilet. For example, A Caroma Cube bowl is technically "round front', as it measures 16.5" inches, but obviously a typical oval shaped round front seat won't work.

If you have a cube or round or otherwise uniquely shaped bowl, you will often have to use the seat that is supplied by the manufacturer to fit that particular product. For the cube bowl for example, Caroma has a specific Cube seat that fits the dimensions perfectly.
The last consideration might just be the most confusing, and this is choosing features! The most commonly sought after feature in a seat is a soft-close option. Anyone living in a house without a soft-close seat likely has been jarred awake by someone "dropping" the toilet seat in the middle of the night! A soft-close seat has a hinge that lowers the seat slowly, without jarring or loud noises. It has become as close to a 'must-have' as there is in toilet seats.
The next option is a wonderful upgrade for hygiene and that is the quick release detachable seat. All seats of course are "detachable", but a quick release seat means you can simply push a button or two and the seat pops off, allowing for frequent and thorough cleaning. Once you have a quick release detachable seat, you likely won't want to give it up.

Lastly, some seat holes in bowls are set apart more/less than others. For example, older style Caroma bowls sometimes had seat holes that were different that that of current bowls. If you are buying a new seat, (especially for an older bowl, or made by a different manufacturer), it's good to check that the seats will fit into the hole set out on your bowl. This is always indicated on the spec sheet for the seat, that is listed on the manufacturer's website.
So, to summarize- when ordering a new toilet seat, look for:
For help with a new seat for Caroma toilets, you are always welcome to contact the customer service department at 1-800-460-7019.